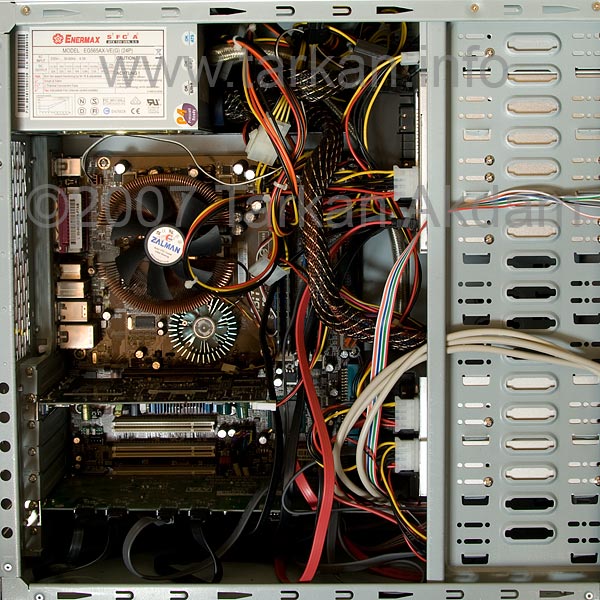
Finally the power supply and motherboard was installed. I then installed the Raid card as well as the graphics card.
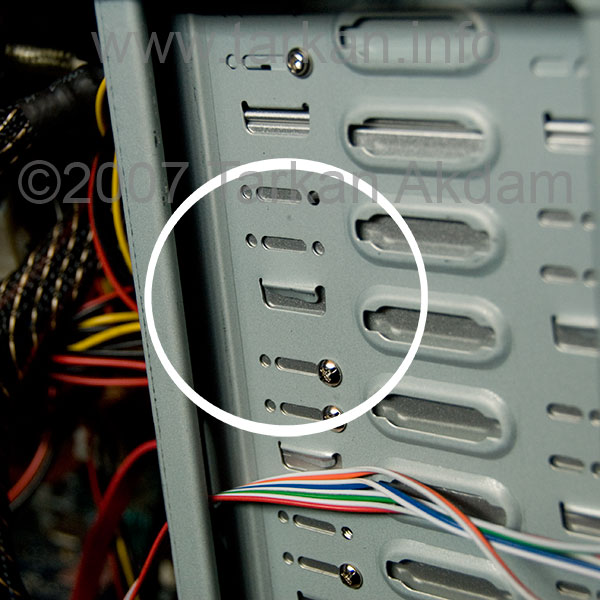 The Icy Dock enclosures caused some problems. The 5.25″ bays are just too small for the enclosures to fit, and as the MB455SPF traverses over 3 5.25″ bays – the bays had to be clear of any obstructions. On the Sharkoon case, the bays have small tabs which create the 5.25″ bays heights, I call them landing tabs. They are formed by the metal being folded in, so with a strong set of pliers I need to fold them back out.
 So after some pulling and pushing I managed to get both enclosures into the case. As you can see from the photos it was a very tight fit. I had to mess about with which bays to install the enclosures, so that the rear fans would clear the motherboard.
The downside of trying to get all this in to a small case is that it becomes impossible to make the installation look neat. However, for all the mess – it does fit and it does work!!
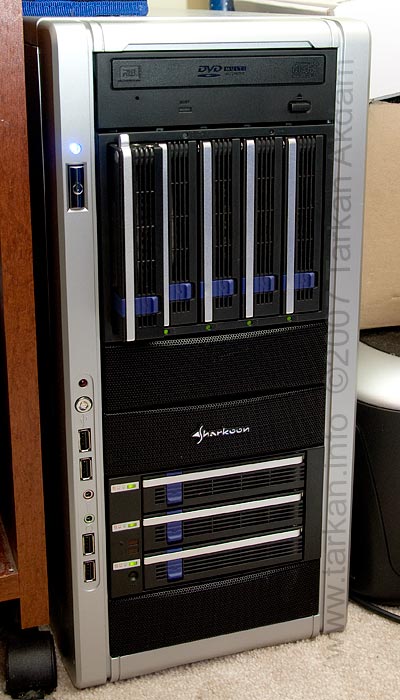 The finished product I think looks amazing and probably the most stylish file server you will ever see!!! (it drips coolness when all the drive access lights start to flash!!)
Conclusion
After building this machine, I noted some issues with this case and its use in this application. Not very major issues and thankfully things which can be fixed easily.
Power led, this blue shining baby is the brightest thing you will ever see – at night it lights up the whole room. So I suggest you either add a resistor into the cable that supplies the LED (470R Should do it), or remove it and replace with a dimmer Red LED.
Power switch and reset button, these two buttons are very poorly placed especially for a headless server (A machine with no keyboard or monitor attached) – accidental press of the power switch or reset is not something you want. So you need to place machine somewhere the switches will not be accidentally pushed.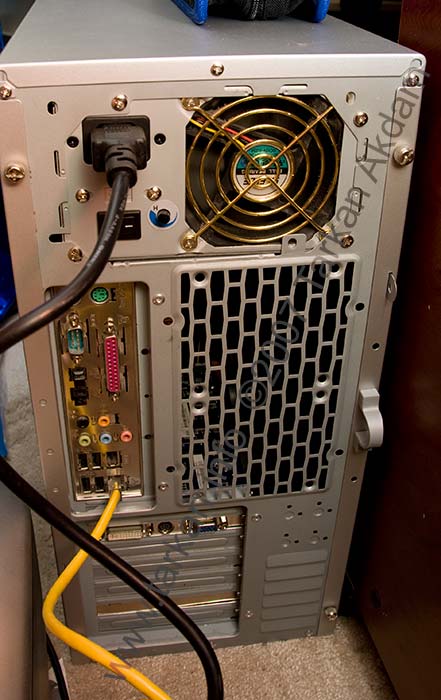
The badly placed reset switch can be accidentally hit while plugging in a USB cable!
I went so far as to just remove the connection for both switches from the motherboard. To make sure the server turns on, I set the BIOS to always switch on when power is applied, removing the need for a power switch.
This build has given me the perfect solution for my storage needs and flexibility to adapt to changes,. In its final configuration – all you have is two connections on the back, network and power. simple!!
In the final part of this series I will look at software options, especially backup and drive partitioning.
Pingback: bruher.com
Pingback: pligg.com
Hope all is well your end (with baby etc). Do you have any thoughts on when part 3 will be up as I’ve been considering making a home file server but am stuck on what software to use; I’ve no clue when it come to Linux distros and your site has been the only one that mentions the possibility of using a Windows based software. So I’m stuck; lol.
I am still intending to do part 3 – sadly having a baby and refurbishing a house has got in the way!!!
I am also using WS2008 in my file server and it will be included in the next part.
Thanks for reading.
hi, is part 3 still in the works when will it be up?
i plan to use windows server 2008 so plz include it in your next part, thanks.
Hi Mufley,
The third and final part will be up soon, I am still experimenting with the software.
I have been hoping the Windows Home Server would have a fix for the corruption issues and looks like they have entered Beta testing on this issue.
I have been running Windows Server 2008 on my server and it has been working great!!
Hi there…
You mention that the third part will focus on the software side.
Have manage or published the third part?
Excellent stuff these 2 parts … looking forward for you third part…
Mufley
It was actually the drive pooling feature which first attracted me to WHS – I tend to upgrade stuff in my workstations quite frequently, and I really liked the idea of being able to just chuck redundant HDDs into the server as and when they became available, and add them all to a single seamless storage “space”… ironically though, as you say, it seems this is the very feature which is currently causing the data corruption issues so many people are experiencing.
I guess an alternative (and no doubt far better) way to do things would be to install FreeBSD 7 or OpenSolaris and use Sun’s phenomenal ZFS (the “last word in file systems”), but it will mean getting to grips with yet another OS…
I beta tested Windows Home Server, while it is has great features – I think Microsoft really failed by adding a secondary file system on top of the O/S filesystem – hence the issues with data corruption, etc….
Thanks for freenas tip, will look in to it.
Vinyl floor tiles are not very maleable – I would really suggest my tip above – the Lead Roof Flashing, very cheap, and very sticky, easy to cut and easy to apply !!!
I’m thinking of a small server build very similar to yours – in fact, I’d already discovered the Sharkoon case and it was googling for further information which brought me to this site.
Like the poster above, I’m finding the neoprene sheeting a little pricey and difficult to source in small amounts – I wonder if self-adhesive vinyl floor tiles, in one or more layers, would do the job (I’ve got plenty of those kicking around)? I guess it’s really just a case of adding mass to the panels and lowering the resonant frequency to a harmless level.
I don’t need hot-swappability for the HDDs, so I’ll probably use Coolermaster 4-in-3 modules as a cheap alternative to the Icy Docks (available in the UK from Scan).
You mentioned a FreeBSD based OS – I guess you’ve already checked out FreeNAS (www.freenas.org)? Personally I was hoping to use Windows Home Server, as it has a perfect feature set for my needs, but until MS fixes the data corruption bug it’s broken and unusable. 🙁
Thanks for posting the details of your project, it’s fascinating stuff, looking forward to the next instalment…
Thanks for the comment. I have delayed my final part as I am testing out windows server 2008 on my server box.
I was contemplating a FreeBSD or Linux based operating system, but I may just stick with MS based as they do seem to work better with the Vista boxes dotted around the house.
If you’re looking for a robust, cheap O/S for your server – I would suggest NASLite-2 from ServerElements. It has served me very well in my 2.3TB server (in a Yeong-Yang YY-B0221 server cube, 9 x HDD’s and a CF>IDE adapter for the O/S). It is currently linux kernel 2.4.35 based and retails for $29.95.
Thank you so much, that’s much more like it!
Cheers
Dan
All you need to find is rubber sheeting it does not have to be anything fancy.
I purchase my sheeting from RS components and a 1.2m x 2m x 3mm comes to about £20. RS are not cheap so you can probably get this from specialist rubber suppliers for much cheaper.
If all fails I have used Roof (lead) Flashing in the past, which does as good a job and it is very cheap and can be picked up from most DIY shops. Last time I looked 75mm x 3m roll was about £2. one roll will probably be enough for a case.
Ah thanks – I was actually asking about the stuff you stuck to the case. Sorry for not being clear.
The only sound insulation I can find from a UK provider is the AcoustiPack material, which is not cheap.. I also saw some insulation material from frozencpu.com which looked ok..
I used the foam air filters from a vacuum cleaner, you can buy the filters for about £2.00 or so from most electrical outlets. It does not matter what manufacturer as you will have to cut it up to the correct size to fit in to the cages.
What foam did you use for this? I’m looking for an economical solution 🙂